
Link Seal Application & Installation

Technical InformationLink-Seal Product

Where can Link-Seals be Used?

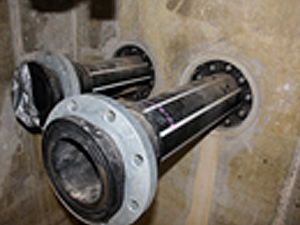
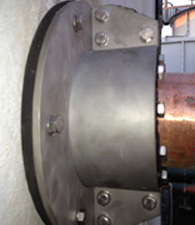
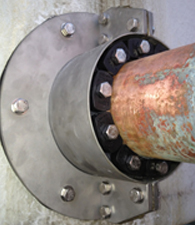
Link-Seals has even been used to seal pipes coming through steel bulkheads in ships.

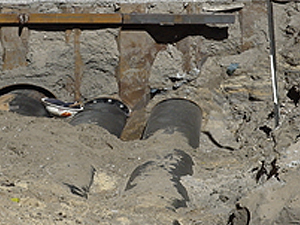
For the client that has a “movable” or “for hire” water or wastewater treatment plant, the Link-Seal is the best possible solution because it can be removed and refitted in a timely manner.

LINK-SEALS can be installed wherever a pipe passes through a solid structure. The most common use is through concrete walls and or floors.

Below are some typical installations of Link-Seals:

  • Bridge Construction
  • Bund/ Fire Protection Wall
  • Cable TV Installations
  • Coal Preparation Plants
  • Decorative Fountains
  • Desalination Plants
  • Dual Containment Seals
  • Electrical Isolation of Pipe Supports for Corrosion Protection
  • Elevator Shafts
  • Fire Protection Wall Penetrations
  • Floor & Wall Sleeves
  • Flow Restrictors in Sewer Maintenance
  • Fluid Overflow Devices
  • Guard Post Assemblies
  • High Pressure Tank Guards
  • Insulated Pipe Seals
  • Mechanical Contractors – Interior Piping Systems
  • Manhole Pipe Entry
  • Marine Applications
  • Mining
  • Offshore Oil Rigs
  • Parking Garage Column Protectors
  • Penetrations
  • Perimeter Berm Installations Around Tank Farms
  • Pile Driving Operations
  • Precast Concrete Walls
  • Pool Pipe Penetrations
  • Power Generating Dams
  • Pulp & Paper
  • Refrigeration Pipe penetrations
  • Road and/or Rail Crossings
  • Septic Tank Installations
  • Telecommunications
  • Thermal Storage Systems
  • Through Deck Fire Breaks
  • Tunneling Operations
  • Underground Steel and Concrete Tanks
  • Valve Pits
  • Waste & Water Treatment Plants

Typical Applications

Standard Application

Ductile iron, concrete, metal as well as plastic pipes may be hydrostatically sealed within walls to hold up to 20 psig (40 feet of static head).

Steel pipe sealed passing through a cored floor penetration

Steel pipe sealed passing through
a cored floor penetration

Various copper pipe sizes sealed with Link-Seals in water tank

Various copper pipe sizes sealed
with link-Seals in water tank

Below Ground Application

  • The annular space between carrier pipes passing through casings may be sealed against the entry of water, soil or backfill material.

    Below-Ground-Application-img1

    Gas Valve Pit – Buried under ground

    Gas Valve Pit – Buried under ground

Existing Work Application

  • Previously formed concrete can be core-drilled to the required diameter for the optimum Link-Seal sizing

    Core penetration

    Core penetration

     HDPE pipes sealed with Link-Seals – cored penetration

    HDPE pipes sealed with Link-Seals – cored penetration

Special Applications

Installation


Step 1: Center the pipe in wall opening or casing

Make sure the pipe will be adequately supported on both ends. Link-Seal Mechanical Seals are not intended to support the weight of the pipe.

Step 2: Loosen rear pressure plate & connect links

Adjust pressure plates just enough so that links move relatively freely and connect both ends of belt around the pipe.


Step 3: Bolt should be facing installer

Check to be sure all bolt heads are facing the installer. Extra slack or sag is normal. Do not remove links if extra slack exists. Note: On smaller diameter pipe, links may need to be stretched.

Step 4: Slide belt assembly into annular space.

Ensure that both front and back plates are inside the penetration. For larger size belts, start inserting Link-Seal assembly at the 6 O’clock position and work both sides up toward the 12 O’clock position in the annular space

Slide Link-Seal in Annular space_Step 4

Step 5: Tighten Link-Seals

Only one contractor with hand tools is required.

LS-200 thru. LS-315: Using a hand socket allen head or off-set wrench ONLY, start at 12 O’clock. Working in a clock- wise manner, tighten each bolt. Do not tighten any bolt more than 4 turns at a time until links have been uniformly compressed.

LS-325 through LS-650 Using a hand socket or off-set wrench ONLY, start at 12 o’clock. Do not tighten any bolt more than 4 turns at a time. Continue in a clockwise manner until links have been uniformly compressed (Approx. 2 or 3 rotations).

Step 6: Bulge Sealing Elements

Make 2 or 3 more passes at 4 turns per bolt MAXIMUM, tightening all bolts clockwise until all sealing elements “bulge” around all pressure plates. On type 316 stainless steel bolts, hand tighten ONLY – do not use power tools.


Step 7: Installation Complete

Link-Seal Sealing Pipe Penetration

LINK-SEAL – Do’s

  1. Make sure pipe is centered
  2. Install the belt with the pressure plates evenly spaced.
  3. Install the exact number of links indicated in sizing charts.
  4. Check to make sure pipe is supported properly during backfill operations. NOTE: LINK-SEAL are not intended to support the weight of the pipe.
  5. Make sure seal assembly and pipe surfaces are free from dirt.
  6. For tight fits, use non-polluting liquid detergent to assist installation.

LINK-SEAL – Dont’s

  1. Don’t Install the belt with the pressure plates aimed in irregular directions. (Staggered)
  2. Don’t Install LINK-SEAL where weld-beads or other irregular surfaces exist without consideration of the sealing requirements.
  3. Don’t torque each bolt completely before moving on to the next.
  4. Don’t use high speed power tools
  5. Do not use power tools on LINK-SEAL modular seal 316 stainless steel bolts.
  6. Don’t use grease installing LINK-SEAL modular seals.

The Projex Mission is to source and supply technically excellent products to meet the needs of owners, designers, insurers and operators of buildings and structures for specialist protection against water, industrial liquids, impact and corrosion risks.